You've heard of Alan Turing? Turing award? Turing test?
How about the Enigma machines and encryption/decryption?
What about the first computers?
What's the connection between these three?
Bletchley Park. It's a great place and historically very significant - but underfunded and in need of maintenance otherwise it'll be lost forever. Please help save Bletchley Park for future generations. Help support it by visiting - it's a great day out.
If you are an Agile coach - go to the Agile Coaches Gathering which is being held at Bletchley Park.
Copyright © 2009 Ivan Moore
Sunday, March 8, 2009
Friday, March 6, 2009
Bootable USB sticks for conference presentations
If you have a programming workshop or tutorial to present at a conference, where people bring their own laptops and you want to give the participants programming things to do, then one of the things that always seems to take more time than you expect (during the session) is setting up environments etc before being able to actually do any programming.
With Stuart Ervine, a colleague of mine who is running a session on GWT at SPA2009 (book now!), we have done some experimenting and now have a setup that I think works quite well - so I wanted to share it here in case it is helpful to others presenting similar sessions.
Having presented "Programming In The Small" (PITS) with Mike Hill at "Software Craftsmanship 2009" I can report that it worked quite well in practice (not perfect though - more on the glitches later).
Providing a complete environment:
Stuart and I wanted an identical environment / setup for all of the participants, so time wouldn't be wasted getting everything working on lots of different platforms. Even if you provide one click installers, participants may be understandably reluctant to install some software just for your session. They may even have things installed which conflict with whatever you want to give them. Therefore, we thought it would be better to provide a complete environment - OS and all.
We considered two approaches, providing a virtual image (e.g. VMWare or VirtualBox) with everything installed and configured, or using a bootable USB stick. I attended Lasse Koskela and Markus Hjort's excellent session "Reading Code Without Psychic Powers" where they provided bootable CDs which included the complete environment for several different languages. It worked very well - if rather slow to initially boot up. Having had that experience as a participant, Stuart and I decided to try bootable USB sticks.
Making a bootable USB stick:
First - download the latest Ubuntu (currently 8.10) - and burn it to a CD (good instructions available on the Ubuntu site). Boot your computer off the CD and be patient while Ubuntu starts (it's slow off a CD). These instructions are provided entirely at your risk.
Create two partitions on the USB stick:
Write Ubuntu onto the USB stick:
You can copy whatever programs, files etc the participants need to the other partition (the second one you created). For the PITS session this meant Eclipse, Harmony JDK and an Eclipse workspace with the projects for the session. Running from the USB stick won't be very fast but may be acceptable.
To make your software run faster:
If you want the software to run faster, then set it up for participants to copy to the Ubuntu desktop (where it will be running from memory).
If you want to run memory hogging software from the desktop then participants might not have enough RAM (they might run out of memory and I think the live Ubuntu won't try to use the hard disk for swap space). You can set up Ubuntu to use swap space on the USB stick. To create and mount a 1Gb swap file:
Create an empty file the size of the swap space you want to provide (where /media/disk-1 is where the second partition created earlier is mounted) (this may take a few minutes):
dd if=/dev/zero of=/media/disk-1/swapfile.swp bs=1024 count=1024k
Provide an executable script in the second partition for participants to run if they need swap space, containing:
mkswap swapfile.swp
sudo swapon swapfile.swp
Mass production:
So far so good - however, you don't want to have to do this for every USB stick you need to create. Having created one USB stick which has everything set up just right, you can copy its entire contents (including partition table) to other USB sticks using the following (where /dev/sde is the "master" USB stick and /dev/sdf is the one you want to copy to):
dd if=/dev/sde of=/dev/sdf bs=8M count=250
This copies the first 2Gb from USB stick /dev/sde to USB stick /dev/sdf. In order to make this mass copying faster, for the PITS session we didn't use all the space of the USB sticks. We created the second partition using only part of the remaining space. The numbers for "bs" and "count" were arrived at experimentally to minimize the time it took to make the copies. (Multiply them together to work out the amount copied - i.e. using "bs=4M count=500" copies the same amount, but with my USB sticks was slightly slower). The copying may take a few minutes per stick.
Glitches and gotchas:
It would have been nice to allow participants to keep the USB sticks but they cost money and we're not working for some large consultancy who might want to do this for promotion.
You need one USB stick per machine (we had participants pairing).
We provided other mechanisms for participants to get the materials for the session - it was fairly straightforward for the PITS session as it was pure Java - so we provided the source (and Eclipse and IntelliJ project files) for participants who already have a Java environment. A lot of participants were very organized and had downloaded these materials from the conference web site before the session. We provided the materials in password protected zips and gave participants the password at the session.
And finally:
If you want to see this in action - go to Stuart's GWT session at SPA2009. Ubuntu rocks. GWT rocks. Stuart rocks. Mike rocks. SPA rocks.
Many thanks to Stuart Ervine for help with working this all out and writing it up. Many thanks to Mike Hill for preparing and co-presenting PITS.
Copyright © 2009 Ivan Moore
With Stuart Ervine, a colleague of mine who is running a session on GWT at SPA2009 (book now!), we have done some experimenting and now have a setup that I think works quite well - so I wanted to share it here in case it is helpful to others presenting similar sessions.
Having presented "Programming In The Small" (PITS) with Mike Hill at "Software Craftsmanship 2009" I can report that it worked quite well in practice (not perfect though - more on the glitches later).
Providing a complete environment:
Stuart and I wanted an identical environment / setup for all of the participants, so time wouldn't be wasted getting everything working on lots of different platforms. Even if you provide one click installers, participants may be understandably reluctant to install some software just for your session. They may even have things installed which conflict with whatever you want to give them. Therefore, we thought it would be better to provide a complete environment - OS and all.
We considered two approaches, providing a virtual image (e.g. VMWare or VirtualBox) with everything installed and configured, or using a bootable USB stick. I attended Lasse Koskela and Markus Hjort's excellent session "Reading Code Without Psychic Powers" where they provided bootable CDs which included the complete environment for several different languages. It worked very well - if rather slow to initially boot up. Having had that experience as a participant, Stuart and I decided to try bootable USB sticks.
Making a bootable USB stick:
First - download the latest Ubuntu (currently 8.10) - and burn it to a CD (good instructions available on the Ubuntu site). Boot your computer off the CD and be patient while Ubuntu starts (it's slow off a CD). These instructions are provided entirely at your risk.
Create two partitions on the USB stick:
- From the System menu, Administration submenu, select "Partition Editor"
- Take a note of the device(s) available.
- Insert a USB stick that you want to use for this (it will get completely overwritten, and must be at least 1Gb - we used 4Gb sticks).
- Right click on the USB stick that has been recognised and "Unmount Volume".
- In the "Partition Editor" (GParted) select menu item GParted -> Refresh Devices
- In the "Partition Editor" (GParted) select the USB stick from the menu GParted -> Devices
- if you proceed from this point with the wrong device selected then you'll trash your machine, so don't get it wrong. Clues about which device is the USB stick are the size of the device and that it wasn't on the list before you plugged it in.
- For each of the partitions on the USB stick (there will usually only be one) right click and "Delete"
- Click on the (now grey) bar which represents the partitions on the USB stick
- Click "New"
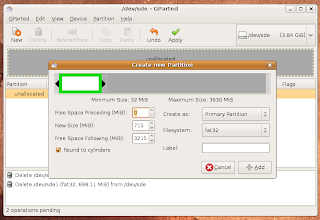
- Drag the right hand side of the bar and create a FAT32 partition large enough for the Ubuntu image (about 710Mb should be enough). See image below.
- Click on the (now grey) bar which represents the unpartitioned space on the USB stick
- Click "New"
- Create another partition - can be FAT32 or ext2 - doesn't really matter much. (I found FAT32 to be fine).
- Click "Apply"
- Close the "Partition Editor" (GParted)

Write Ubuntu onto the USB stick:
- From the System menu, Administration submenu, select "Create a USB startup disk"
- Select the device which is the USB stick (as noted above when creating the partitions). If you don't see your device in the list of "USB Disk to use", you might possibly have to unmount the newly created partitions of the USB stick, remove your USB stick and put it back in.
- Click "Make Startup Disk"
- Get a cup of tea - this'll take a few minutes
You can copy whatever programs, files etc the participants need to the other partition (the second one you created). For the PITS session this meant Eclipse, Harmony JDK and an Eclipse workspace with the projects for the session. Running from the USB stick won't be very fast but may be acceptable.
To make your software run faster:
If you want the software to run faster, then set it up for participants to copy to the Ubuntu desktop (where it will be running from memory).
If you want to run memory hogging software from the desktop then participants might not have enough RAM (they might run out of memory and I think the live Ubuntu won't try to use the hard disk for swap space). You can set up Ubuntu to use swap space on the USB stick. To create and mount a 1Gb swap file:
Create an empty file the size of the swap space you want to provide (where /media/disk-1 is where the second partition created earlier is mounted) (this may take a few minutes):
dd if=/dev/zero of=/media/disk-1/swapfile.swp bs=1024 count=1024k
Provide an executable script in the second partition for participants to run if they need swap space, containing:
mkswap swapfile.swp
sudo swapon swapfile.swp
Mass production:
So far so good - however, you don't want to have to do this for every USB stick you need to create. Having created one USB stick which has everything set up just right, you can copy its entire contents (including partition table) to other USB sticks using the following (where /dev/sde is the "master" USB stick and /dev/sdf is the one you want to copy to):
dd if=/dev/sde of=/dev/sdf bs=8M count=250
This copies the first 2Gb from USB stick /dev/sde to USB stick /dev/sdf. In order to make this mass copying faster, for the PITS session we didn't use all the space of the USB sticks. We created the second partition using only part of the remaining space. The numbers for "bs" and "count" were arrived at experimentally to minimize the time it took to make the copies. (Multiply them together to work out the amount copied - i.e. using "bs=4M count=500" copies the same amount, but with my USB sticks was slightly slower). The copying may take a few minutes per stick.
Glitches and gotchas:
- Be really careful about mount points (e.g. "/dev/sde") so as not to trash your hard disk.
- Not all machines will boot off a USB. The big glitch is that Apple Macs don't seem to like booting from a USB stick (and even some regular PCs don't). One potential solution for such participants is to provide a bootable Ubuntu live CD and use the USB stick for the programs to run in the live Ubuntu.
- Not all participants were overjoyed at using Ubuntu.
- Participants already using Ubuntu couldn't just run the software included in the second partition because the paths were set up for the "live CD" user.
- Participants need to have some easy way to go from having booted off the USB stick to running the software for the session - we provided a "run.sh" file but in the rush of people getting their machines to boot off the USB (trying to find which key to press to change the boot device) not everyone heard the instructions (which we should have given before handing out the USB sticks).
- Some participants took a while to find the right key to press to boot off a USB device - a lot of machines print the message saying which key to press for such a short time it is difficult to read it. It may be an idea to suggest that participants figure this out before the session.
It would have been nice to allow participants to keep the USB sticks but they cost money and we're not working for some large consultancy who might want to do this for promotion.
You need one USB stick per machine (we had participants pairing).
We provided other mechanisms for participants to get the materials for the session - it was fairly straightforward for the PITS session as it was pure Java - so we provided the source (and Eclipse and IntelliJ project files) for participants who already have a Java environment. A lot of participants were very organized and had downloaded these materials from the conference web site before the session. We provided the materials in password protected zips and gave participants the password at the session.
And finally:
If you want to see this in action - go to Stuart's GWT session at SPA2009. Ubuntu rocks. GWT rocks. Stuart rocks. Mike rocks. SPA rocks.
Many thanks to Stuart Ervine for help with working this all out and writing it up. Many thanks to Mike Hill for preparing and co-presenting PITS.
Copyright © 2009 Ivan Moore
Subscribe to:
Posts (Atom)